

Cloud Deployment Guide for High School Cybersecurity Workshop (HSCW)
Introduction
This guide was written to help educators create a cybersecurity lab environment using Google Cloud resources. While HSCW provides curriculum and virtual machine images for free, we understand that schools often do not have laptops capable of running the virtual machines and cannot afford a physical server to host the machines either.
By using Google Cloud for our lab environment, HSCW can run our course at an affordable price. As of the writing of this guide (April 2024), the standard lab environment costs between $0.50-$0.75 per hour of use per student with a monthly cost of $5-$10 recurring for long term storage of the snapshots.
There are a lot of steps in this process. However, most of this you’ll only have to do once.
This guide will take you through the steps to:
- Build a template on google cloud and save it as a snapshot
- Deploy multiple virtual machines on Google Cloud
- Access those machines via a web browser
- Install the HSCW lab environment
- Manage the cloud deployment to minimize costs
Note: In several of the steps, we will need to set up a password for users and services. In this guide Password1 will be used in all examples. It is highly recommended that you use a different password for your actual deployments. As an additional note, this guide was written for educators who may have a very limited background with IT, Linux, and general system administration. If you are savvy with these technologies and believe you can accomplish several steps with an alternative but more technical method, you are free to do so. Finally, please know that while the costs are low, using Google cloud is not free. You will have to pay money to use this service
Setting up a virtual machine on Google Cloud
- Open a web browser and navigate to Google Cloud Main Page
- Click the “Get Started for free” button

- Create an account and associate a credit card with it for billing purposes
- Log in to google cloud
- Click “Go to Console”
- You will now see the Google Cloud console. There are many, many options. This guide will strictly focus on the ones you need to create and run the lab environment. You can find an extremely large amount of information on other options through the help menus

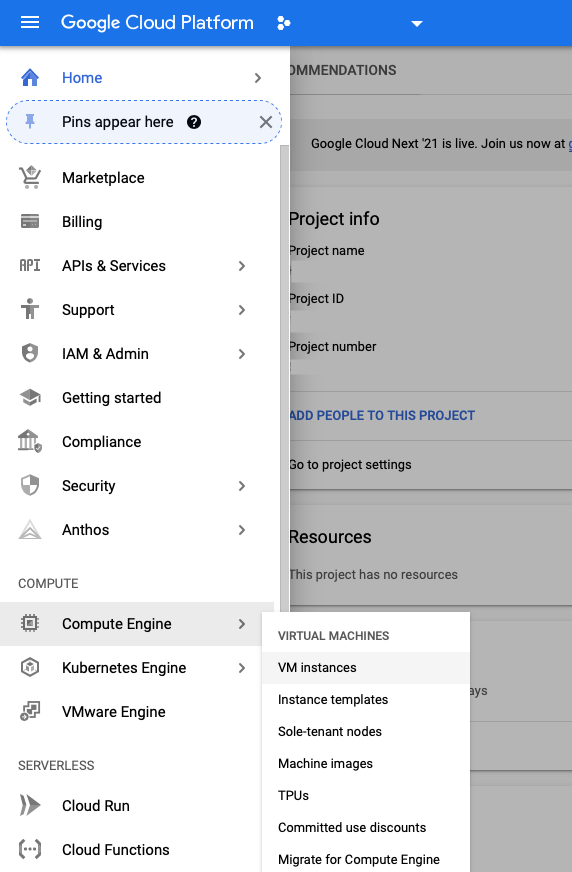
- Click the menu button in the upper left corner of the screen
- Click on “Compute Engine” and then “VM Instances”
- Click the “Cloud Shell” button on the top of the screen

- This will take a moment to load but it will bring up a Command Line Interface (CLI) for running commands on Google Cloud. Most of these actions can be done through the website via mouse clicks, but it takes a very long time. You may have to create a "project" for your class and run the following command in the console:
gcloud config set project PROJECT NAME
Where "PROJECT NAME" is the name of your project. Note, you will have to press "return" after entering the command in order to run it. If you have a project name in ( ) in your console, the project is set.

Note: when following this guide it is CRITICAL that you type the commands described verbatim. Typos will result in errors. While it can be quite difficult to capture every command as typed, we recommend “Copy/Paste” from this guide to assist you in running the commands
- We now need to create a source image from google cloud that will allow us to run virtual machines for the HSCW labs. HSCW is using Ubuntu 22.04 LTS for that image. Create the image by typing the following command in the Cloud Shell:
gcloud compute images create hscw-base --source-image-project=ubuntu-os-cloud --source-image-family=ubuntu-2204-lts --licenses="https://www.googleapis.com/compute/v1/projects/vm-options/global/licenses/enable-vmx"Press return after you type this and. wait for google cloud to finish executing the command.
- We now will create an instance of this machine so that we can begin to configure it. In the cloud shell type:
gcloud compute instances create "hscwbase-1" --zone "us-central1-a" --machine-type "n2-standard-8" --min-cpu-platform "Intel Cascade Lake" --image "hscw-base" --boot-disk-size "80" --boot-disk-type "pd-ssd" --boot-disk-device-name "hscwbase-1"Press return and allow Google Cloud to create the machine. This may take a few moments.
- You may need to press the word "refresh" but you will now see an entry in the VM Instances table on the cloud console. This is your base virtual machine. It currently has no graphical user interface and we have no way to see the desktop yet. These features will be configured later as we progress through this guide. First, we need to configure our machine. Click the “SSH” button in the row for “hscwbase-1”

- A window or tab will open and Google Cloud will set up a secure shell Command Line Interface (CLI) for this new computer that we just created.
You may need to allow your browser to open the popup and click on "Connect"

- We first want to run as the “root” or top level admin account. To do this, type
sudo suThen press return
- We now want to update the base software. In your CLI, type:
apt updatePress return and wait for the command to finish. Then type:
apt upgradePress return.It will ask if you want to continue type Y and press return. Wait for it to finish.
The console may tell you that you need to select services for restart. If so, press the tab key and press return.
Then type the following and press return
rebootYour ssh session will terminate. This is normal. The image is rebooting. You will need to wait for it to reboot and then click the ssh button again. Give it about a minute to be safe. When you have your ssh window back, enter the following and press return
sudo su- We now want to add a user for this machine. In the machine CLI, type
adduser studentPress return. It will ask for a password. In this guide, we will use Password1. Please choose your own password for the student account. You will be asked to confirm the password information. The operating system will then ask for some details regarding the account. These do not have to be anything real but you need to fill it out. Type Y when asked and press return.
- We now want to give the student account “sudo” rights to run administrator commands. Type:
usermod -aG sudo studentPress return.
- We now will switch to the student account to finish configuring this machine. Type the following commands
exitPress return
su studentPress return and enter your the password you made in step 18. Press return after you enter your password.
- You are now logged into your virtual machine as “student”. We are going to install a user interface and a service called “xRDP” so that this machine will have an interface that works with a mouse similar to most computer environments that you may be used to. Type the following commands
sudo apt install xubuntu-desktopPress return. You will be asked for your password. Type it and press enter. You will be asked if you want to continue. Type Y and press enter. A lot of things will happen on the screen. Let it complete. You may be prompted to select a window manager. Press the down arrow, select "lightdm" and press return. (It will keep installing, so wait for it to completely finish).

- We now need to install the xRDP service. To do this type:
sudo apt install xrdpPress return. Type Y when asked. Let it complete. Then Type:
sudo systemctl enable xrdp.servicePress return.
- We now need to configure our student account to access the desktop when we connect to it. Type:
cd ~That "~" is next to the "1" key, you'll need to press shift to get it. Press return after you type the command. Then type:
nano .xsessionPress return. Your screen will change. You are now in a command line text editor (sort of like notepad). Type:
xfce4-sessionPress “Control-X” to exit. It will ask if you want to save. Type Y , then press return when it asks if “.xsession” is the right File Name. You will be back in your command line for the virtual machine
Configuring Apache Guacamole so we an access the Desktop via a web browser
We now need a way so that you (and your students can access the desktop). This guide will use the free software “Apache Guacamole” so that all you will need is the IP address of your virtual machine and a web browser to access the desktop
Note: We are going to have to install a lot of software and configure it. Once we are done, we can save this snapshot so you will not have to do this again
In your command line. We will install the necessary software to build Apache Guacamole. Type:
sudo apt updatePress return. Type Y if you are asked to. Wait for it to finish. Then Type:
sudo apt upgradePress return. Type Y if you are asked to. Wait for it to finish. Then Type:
sudo apt install apache2Press return. Type Y if you are asked to. Wait for it to finish. Then Type:
sudo systecmctl enable apache2.servicePress return. Type Y if you are asked to. Wait for it to finish. Then Type:
sudo apt install make gcc g++ libcairo2-dev libjpeg-turbo8-dev libpng-dev libtool-bin libossp-uuid-dev libavcodec-dev libavutil-dev libswscale-dev freerdp2-dev libpango1.0-dev libssh2-1-dev libvncserver-dev libtelnet-dev libssl-dev libvorbis-dev libwebp-devPress return. Type Y if it asks you. Wait for it to finish. It will take a moment. Then type:
sudo apt install tomcat9 tomcat9-admin tomcat9-common tomcat9-userPress return. Type Y if it asks you. Wait for it to finish. Then type:
sudo systemctl start tomcat9Press return and type:
sudo systemctl enable tomcat9Press return.
- We now need to download the Guacamole source code from the internet. This is a little tricky since we can’t just open a web browser (yet). If you’re familiar with SSH and SCP, you can download the files from https://guacamole.apache.org and install them to your virtual machine via SCP. However, we are going to assume that you don’t know how to use SCP and need some help. If that is the case, in your virtual machine CLI, type:
wget https://downloads.apache.org/guacamole/1.5.5/source/guacamole-server-1.5.5.tar.gzPress return, wait for it to finish. Then type:
tar -xvzf guacamole-server-1.5.5.tar.gzPress return. Then type
wget https://downloads.apache.org/guacamole/1.5.5/binary/guacamole-1.5.5.warPress return
- We need to place the “.war” file in the proper directory for the virtual machine to understand how to use guacamole. Type:
sudo cp guacamole-1.5.5.war /var/lib/tomcat9/webapps/guacamole.warPress return.
- Now we need to create an encrypted version of a Password to use with guacamole. For this example we are going to use Password1. You should use the password you made for the user “student”. Hopefully, it is not Password1 because that is a lousy password and will put your machine at risk. Type:
echo -n Password1 | md5sumPress return.
THIS IS IMPORTANT. Highlight the encrypted version of the phrase “Password1” and copy it [Control-C on windows, Command-C on mac]. Open a texteditor (TextEdit, Notepad, etc). And paste it. You will need it later.
- We are now going to use the “nano” text editor again to make some configuration files. Type the following:
sudo mkdir /etc/guacamolePress return. Then type:
cd /etc/guacamolePress return. Then type:
sudo nano guacamole.propertiesPress return. You are back in the nano text editor. Type the following exactly as it is shown below (including carriage returns):
#Hostname and port for guacamole
guacd-hostname: localhost
guacd-port:     4822
Press Control-X to exit nano. Type Y when it asks about the file name and press return. Then Type:
sudo nano user-mapping.xmlPress return. You are back in the nano text editor. Type the following exactly as it is shown below (including carriage returns and tabs):
<user-mapping>
    <authorize
            username="student"
            password="2ac9cb7dc02b3c0083eb70898e549b63"
            encoding="md5">

        <!-- First authorized connection -->
        <connection name="localhost">
            <protocol>rdp</protocol>
            <param name="hostname">localhost</param>
            <param name="port">3389</param>
            <param name="username">student</param>
            <param name="password">Password1</param>
        </connection>
    </authorize>
</user-mapping>
It will look like this:

NOTE: On the 4th line, the cyper in the quotes for the password needs to be replaced with the one you made in the previous step. Copy it from your text editor and paste it in that section. On the 13th line you see Password1 in the field. This is strictly the example for this guide. You should use the password you picked for the student account.
Press Control-X to exit nano. Type Y when it asks about the file name and press return.
- We now need to build the guacamole server. Type the following:
cd /home/student/guacamole-server-1.5.5Press return
sudo ./configure --with-systemd-dir=/etc/systemd/systemWait for it to finish. Press return. Then type:
sudo makeWait for it to finish. Press return. Then type:
sudo make installWait for it to finish. Press return. Then type:
sudo ldconfigPress return. Then type:
cd ..Press return
- We've now configured guacamole. We also need to configure the Apache webserver so we can access the desktop from a web browser. Type:
sudo a2enmod proxy proxy_http sslPress return.
Note: We are building this machine to use an unencrypted connection to the computer's desktop. This means anyone who can intercept web traffic can see this desktop if they do so. We choose to do this because we will deploy these machines before a lab and destroy them afterwards, so they are not online permanantly and we accept this risk. If you want your machines to be more permanent (and are willing to pay the Google Cloud fees in order to do so), please research how to configure your machines with DNS and install an approved security certificate. For those interested in using "self-signed" certificates, please note that modern web browsers will often not permit these connections anymore due to security concerns
- Now we need to tell the machine’s web server to send you to guacamole. Type:
sudo nano /etc/apache2/sites-available/000-default.confPress return. We are back in nano. Scroll down to the end of the file, On the line above </VirtualHost> press return, then TAB twice and type:
# /guacamole settings
<Location /hscwlab>
    Order allow,deny
    Allow from all
    ProxyPass http://127.0.0.1:8080/guacamole flushpackets=on
    ProxyPassReverse http://127.0.0.1:8080/guacamole
</Location>
While we used "hscwlab" as the Location, you can call it whatever you want (but you'll need to remember that when you type in the web address). Here is a picture of how it looks:

Press Control-X to exit nano. Type Y when is asks about the file name and press return.
- Now we are ready to finish the guacamole setup. Type the following:
Press return. Then type:sudo systemctl restart apache2
Press return. Then type:sudo systemctl restart tomcat9
Press return. Then type:sudo systemctl restart guacd
Press return. Then type:sudo systemctl enable guacd
Press return. Then type (again):exit
Press return.exit
Configuring the Virtual Machine for HSCW Labs
- Go to you Compute Engine VM Instance webpage on Google Cloud:

There is an IP address (External IP) listed for your Virtual Machine -- Note This will change every time you restart your instance. For our example, it is
34.136.98.94Open a new web browser tab/window and havigate to
http://34.136.98.94/hscwlab/Remember you will need to replace that IP addresw with the actual one from your display. Also, if you named your location something other than "hscwlab", you'll need to type that instead
Once the site loads, you’ll see the login for guacamole login with the user student and password Password1 (of course, use the real password you set for student)

- You'll now see a computer desktop in your web browser. This is the machine for the labs. You may get some popup windows asking for student's password, you can enter it. You may also get something Saying there is a problem, you can hit "cancel"


- Click on “Applications” in the upper-left corner and select “Terminal Emulator”. You will get a CLI inside a window on your desktop.

- In the terminal window, type:
sudo apt update
sudo apt upgrade
sudo apt install virtualbox
Press return after each command. Type your password when prompted and type Y when prompted. Wait for it to finish.
- We now need to download the virtual machines for the HSCW Lectures. If you’ve been given the curriculum, you will have received a download link. You will need that link for this next step. In terminal type the following:
cd ~Press return. Then Type:
sudo chown -R $USER:$USER ~/.cachePress return
Now we need a web browser in this virtual machine. Type:
sudo apt install firefoxPress return. Then close terminal when it finishes installing.
Now open firefox from within your virtual instance (Globe Icon at the bottom of your instance)
Type/paste in the download link for the Virtual Machines.
Select Download when the option appears on your screen
Select Download Anyway
Select Save File
Let it finish downloading, it is a large file
Double click on the zip file wherever you downloaded it (Most likely Student Download’s folder)
Select “Extract” and save the files to the desktop. It may take a few minutes.
Click on Applications → System → Virtualbox to launch Virtualbox

In Virtualbox, click File → Import appliance to import each of the .ova files from the download. This make take a little while. If you need a refresher on using Virtualbox, please use
“Lecture 0”from the teacher's edition of the HSCW curriculumYou may want to adjust the VM Display Settings in Virtualbox to "VMSVGA" Graphics Controller if it is available. This will improve screen latency.
Make any configurations you would like to this machine before logging out (Change the wallpaper if you have a theme for your class, Modify Virtual box hotkeys for releasing the mouse/keyboard, Any other custom setting you want for your class)
If you would like shortcuts to lanch and run your labs, please see the section on "Advanced Virtualbox Configuration" at the end of this guide. You'll want to implement those steps at this point
You now have a workstation that is ready for the workshop. We will now configure your cloud environment so that it will be easy to make multiple versions of this instance. Close all applications inside the instance and log out of your instance
Log out of Guacamole when the prompt appears

Setting up an Instance Snapshot on Google Cloud
In your Google Cloud Compute Engine console, select your instance and the select "STOP"
Wait for your instance to stop. The Green check mark will no longer be there when it is stopped (You may need to click "Refresh")
Click on Snapshots, then Create Snapshot

Provide an easy to remember name for your snapshot. In our example we will use cyber-lab. Provide notes if you want and under source disk, select your instance, then click "Create"
Wait for the snapshot to complete
You now have a base template to make future instances. If you wish to minimize cost, you can now delete your original instance and the image you made in step 11
Using the snapshots to run a workshop
- When you want to make multiple instances for a lab, open your computer engine console and click on the cloud shell
- In the cloud shell type the following (this is to create 4 instances, you can use whatever number you like):
Press returngcloud compute instances create lab1 lab2 lab3 lab4 --source-snapshot cyber-lab --zone=us-central1-a --machine-type=n1-standard-8

- To access any specific instance, your students will need to do the following:
- Open a Web Browser
- Navigate to http://(Machine's IP)/hscwlab/
- Login as "student" with the password you created
The students will then be able to use the lab environment via the VirtualBox application inside their instance (follow the guides from the HSCW teacher's edition)
You may want to set up a class webpage with student access links if you don't want to have the students copy the IP addresses by hand.
Here are a few notes on managing cost and ease of use:
- You may run into a quota limit on CPUs if you launch a lot of instances. If that happens, just search “quota” in the top of your console, find the quota for your zone, and request an increase.
- The External IP will change every time your start/stop your instances. There are several guides for setting a static external IP that you can find in google cloud documentation. You will be charged $0.01/hour when your machine has a static IP and is turned off. While this is a low rate, it can add up if you make a large number of instances and leave them running
- We recommend deleting your instances when you are not teaching a workshop. This will reduce your monthly storage costs as you will only be storing the snapshot.
Hopefully, this guide will aid you in providing workshops to your students. We wish you the best of luck.
Optional - Advanced VirtualBox Configurations
If you would like to avoid having your students interact directly witht the virtualbox application, you can make some additional configurations so that the students are only interacting with Desktop shortcuts. This section will provide guidance on how to do that:
- Within your VM, open the VirtualBox application
- In VirtualBox click File --> Host Network Manager
- Uncheck the box for
DHCP Serverand close the window - Click on Settings for
SecTestWS - Under Network Settings, click the tab for "Adapter 3` and Enable it
- Then set the network to
Host-only Adapter - Click OK
- Start the VM for SecTestWS and log in (credentials are in Teacher Manual)
- In SecTestWS, double-click Xterm and type
nano /etc/network/interfacesAdd the following lines to the end of the file
auto enp0s9
iface enp0s9 static
address 192.168.56.100
netmask 255.255.255.0
Then press Control-X followed by Y to save it
Then type
systemctl restart networkingNow type the following:
nano /etc/xrdp/xrdp.ini- Change the line that says
port=3389toport=3390 - Press Control-X and type
Yat the prompt - Shut down the SecTestWS Virtual Machine
- For each of your VMs, take a snapshot and name it
baseline - Close VirtualBox
- You will now create a series of shell scripts to run the VMs, Connect Remotely, and Stop them. This guide will show how to do that for the Intro lab. You can easily make additional scripts/launchers by using the appropriate VM names in the scripts.
- Open the Terminal Emulator and type
sudo apt install freerdp2-x11
cd ~
nano Start_Intro_Lab.sh- In the nano text editor type the following:
#! /bin/bash

#Script to start the lab
echo "Starting Lab Machines -- Intro Lab"

VBoxManage snapshot SecTestWS restore baseline
VBoxManage snapshot SimpleTarget restore baseline
VBoxManage startvm SecTestWS --type=headless
VBoxManage startvm SimpleTarget --type=headless

echo "Waitingfor Machines to finish booting"
sleep 45

echo "Please Run ConnectToLab Shortcut"
sleep 5
Press Control+X and type Y at the prompt
- Then type
chmod +x Start_Intro_Lab.sh- To create the stop script, type
nano Stop_Intro_Lab.shand enter:
#! /bin/bash
VBoxManage controlvm SecTestWS poweroff
VBoxManage controlvm SimpleTarget poweroff
Press Control+X and type Y at the prompt
- Then type:
chmod +x Stop_Intro_Lab.sh- To create the Connect to lab script, type
nano ConnectToLab.shand enter:
#! /bin/bash
xfreerdp -f -u root -p Password1 192.168.56.100:3390
Press Control+X and type Y at the prompt
- Then type:
chmod +x ConnectToLab.sh- Close the Terminal Emulator
- Right Click the Destkop and select "Create Launcher"
- Under Name Enter "Start Intro Lab"
- Under Command Enter
./Start_Intro_Lab.sh - Under Working Diretory
/home/student/ - Select an Icon if you would like one
- Check the Box that says "Run in Terminal"
- Repeat this process for the
Stop_Intro_Lab.shscript and forConnectToLab.sh, as well as any other scripts you have made - Now you can do the following:
- Start the Intro Lab machines in the background by double clicking "Start Intro Lab" shortcut
- Create a full screen session to the environment by double clicking "ConnectToLab" shortcut
- When you log out of the remote session at the end of class, you can stop the machines by double-clicking "Stop Intro Lab" shortcut